> ## Documentation Index
> Fetch the complete documentation index at: https://docs.promo.cv/llms.txt
> Use this file to discover all available pages before exploring further.
# Adding Brand Ambassadors to Your Roster
> Learn how to build your talent pool by inviting, importing, or manually adding brand ambassadors to your agency roster.
Your roster is your agency's talent pool — a centralized directory of every brand ambassador you work with. There are several ways to add talent to your roster, from sharing an invite link to bulk-importing from a CSV file.
## Prerequisites
* An active agency account on Promo
* At least one published activation (for the invite link method)
## Navigate to your roster
Click **Roster** in the sidebar to open your talent directory. You'll see all your current brand ambassadors displayed as cards with their photos, names, and location.
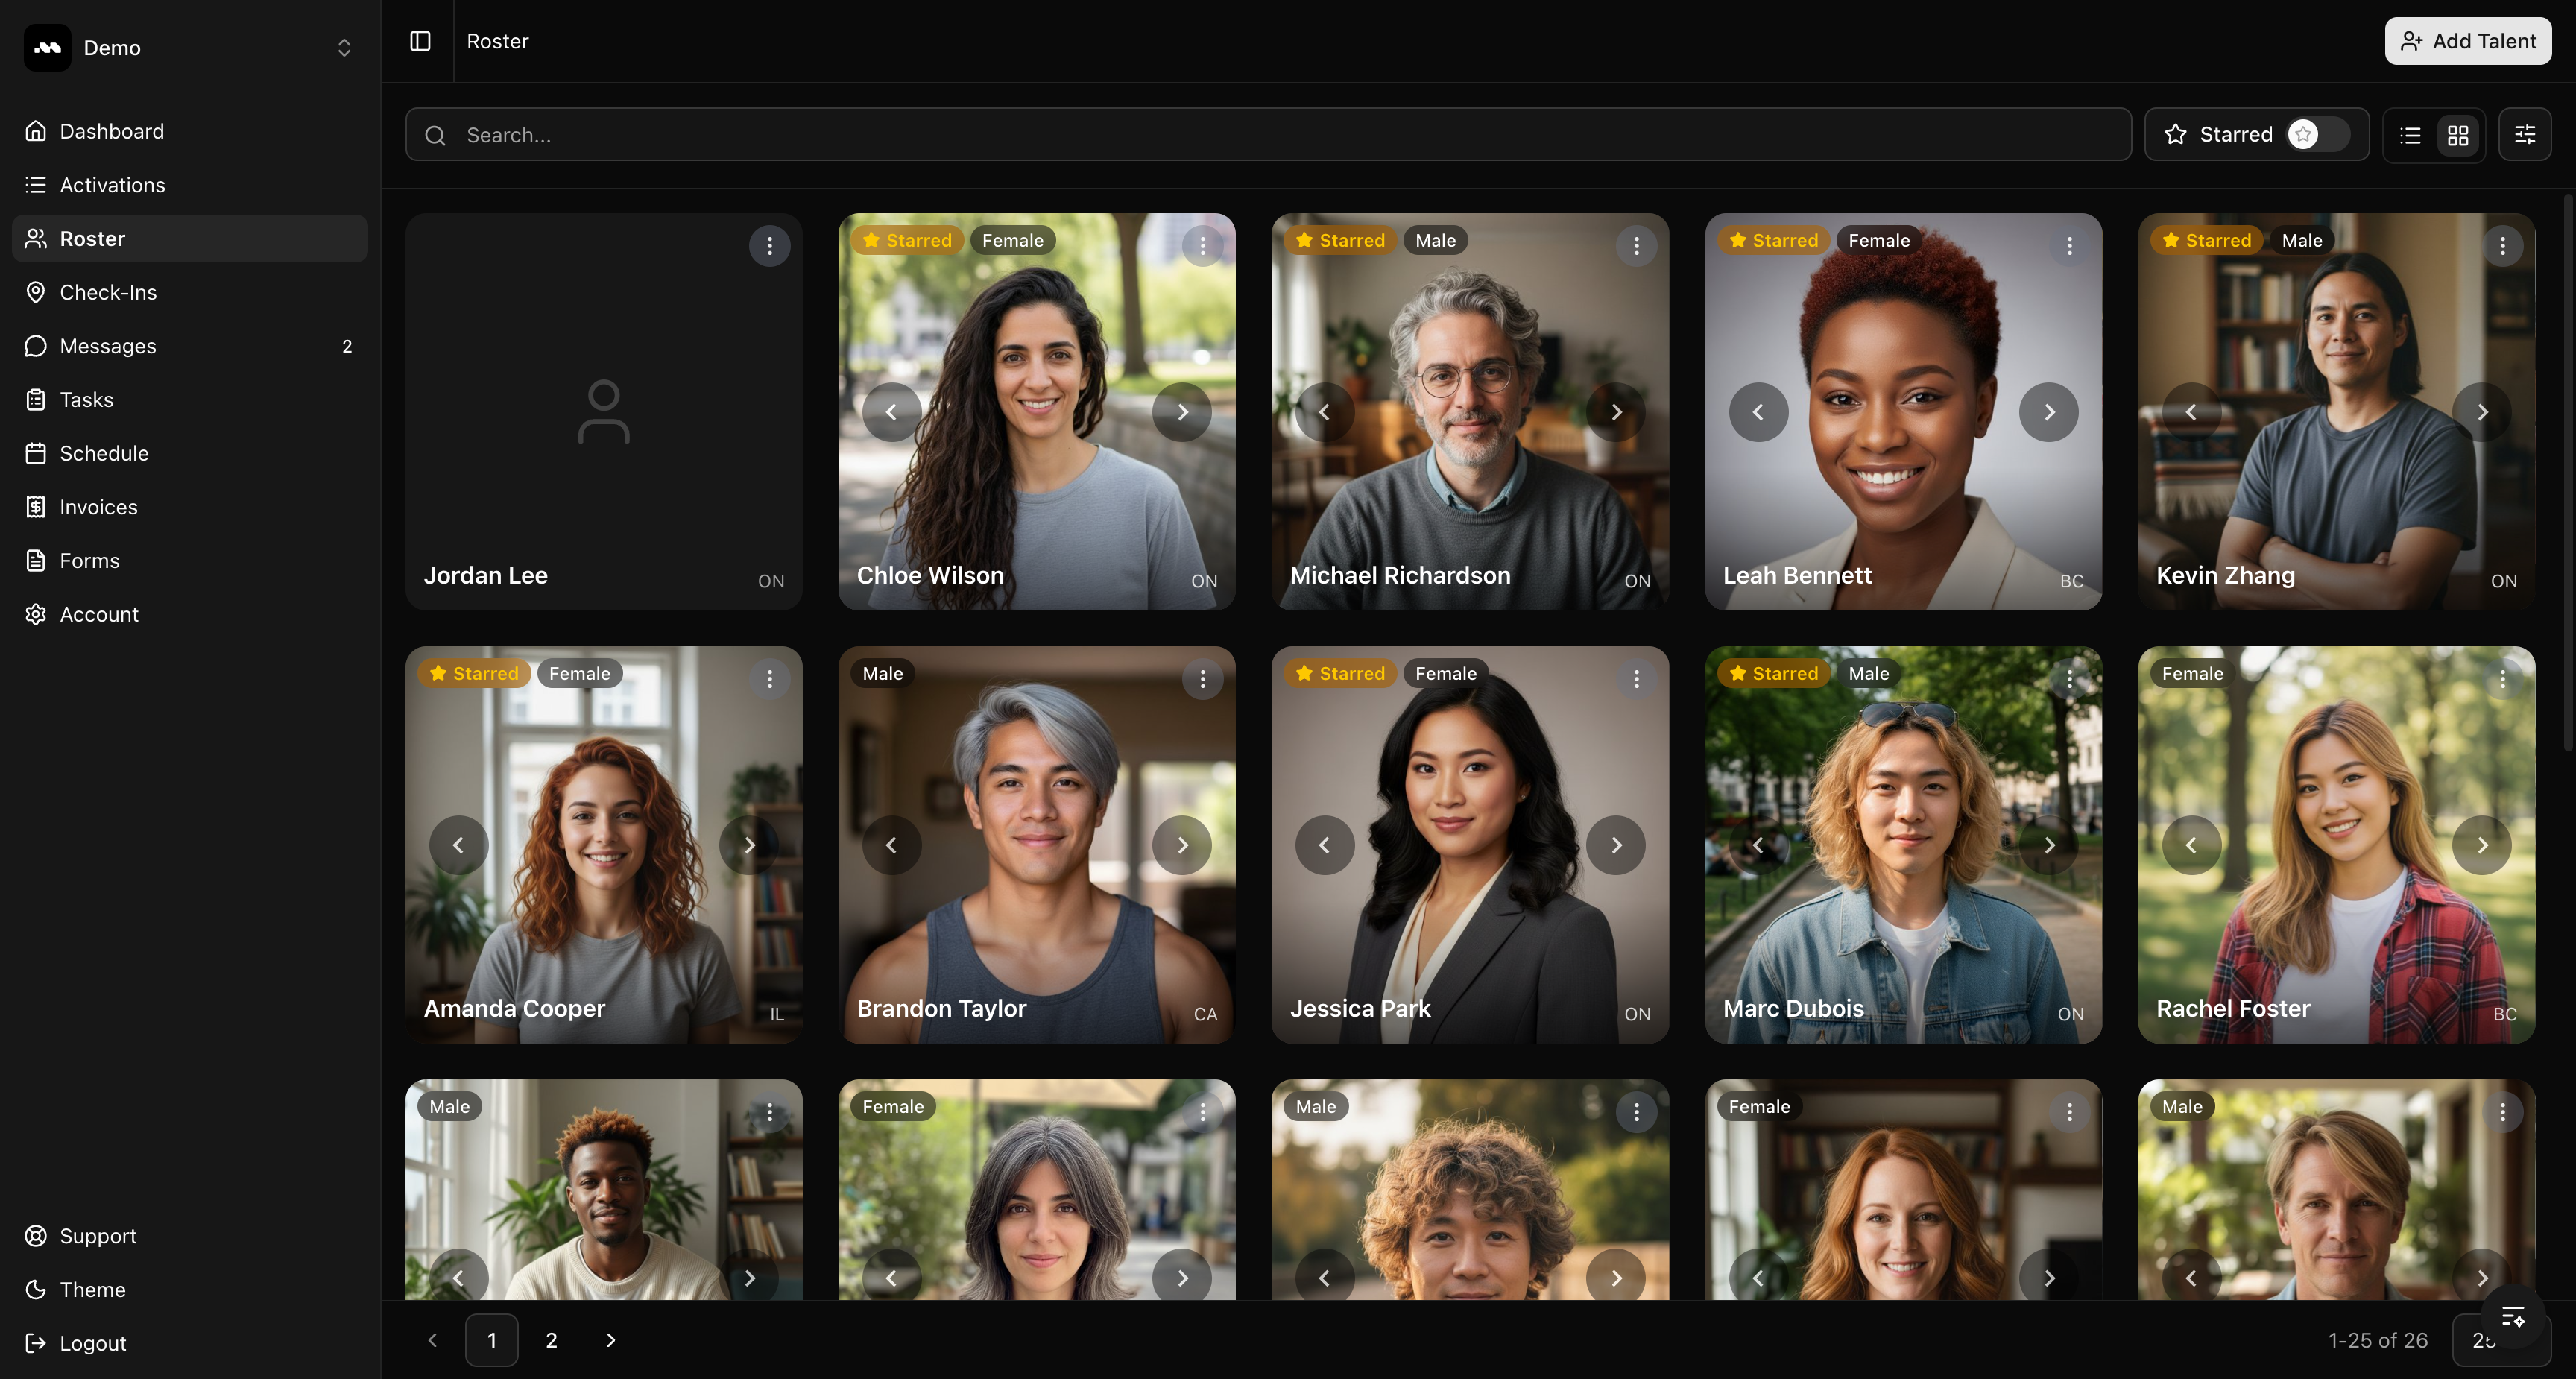 Use the toolbar at the top to search by name, filter by starred status, or switch between card and list views.
## Open the Add Talent modal
Click the **Add Talent** button in the top-right corner. This opens a modal with four methods for adding ambassadors to your roster.
Use the toolbar at the top to search by name, filter by starred status, or switch between card and list views.
## Open the Add Talent modal
Click the **Add Talent** button in the top-right corner. This opens a modal with four methods for adding ambassadors to your roster.
 ## Method 1: Share an invite link
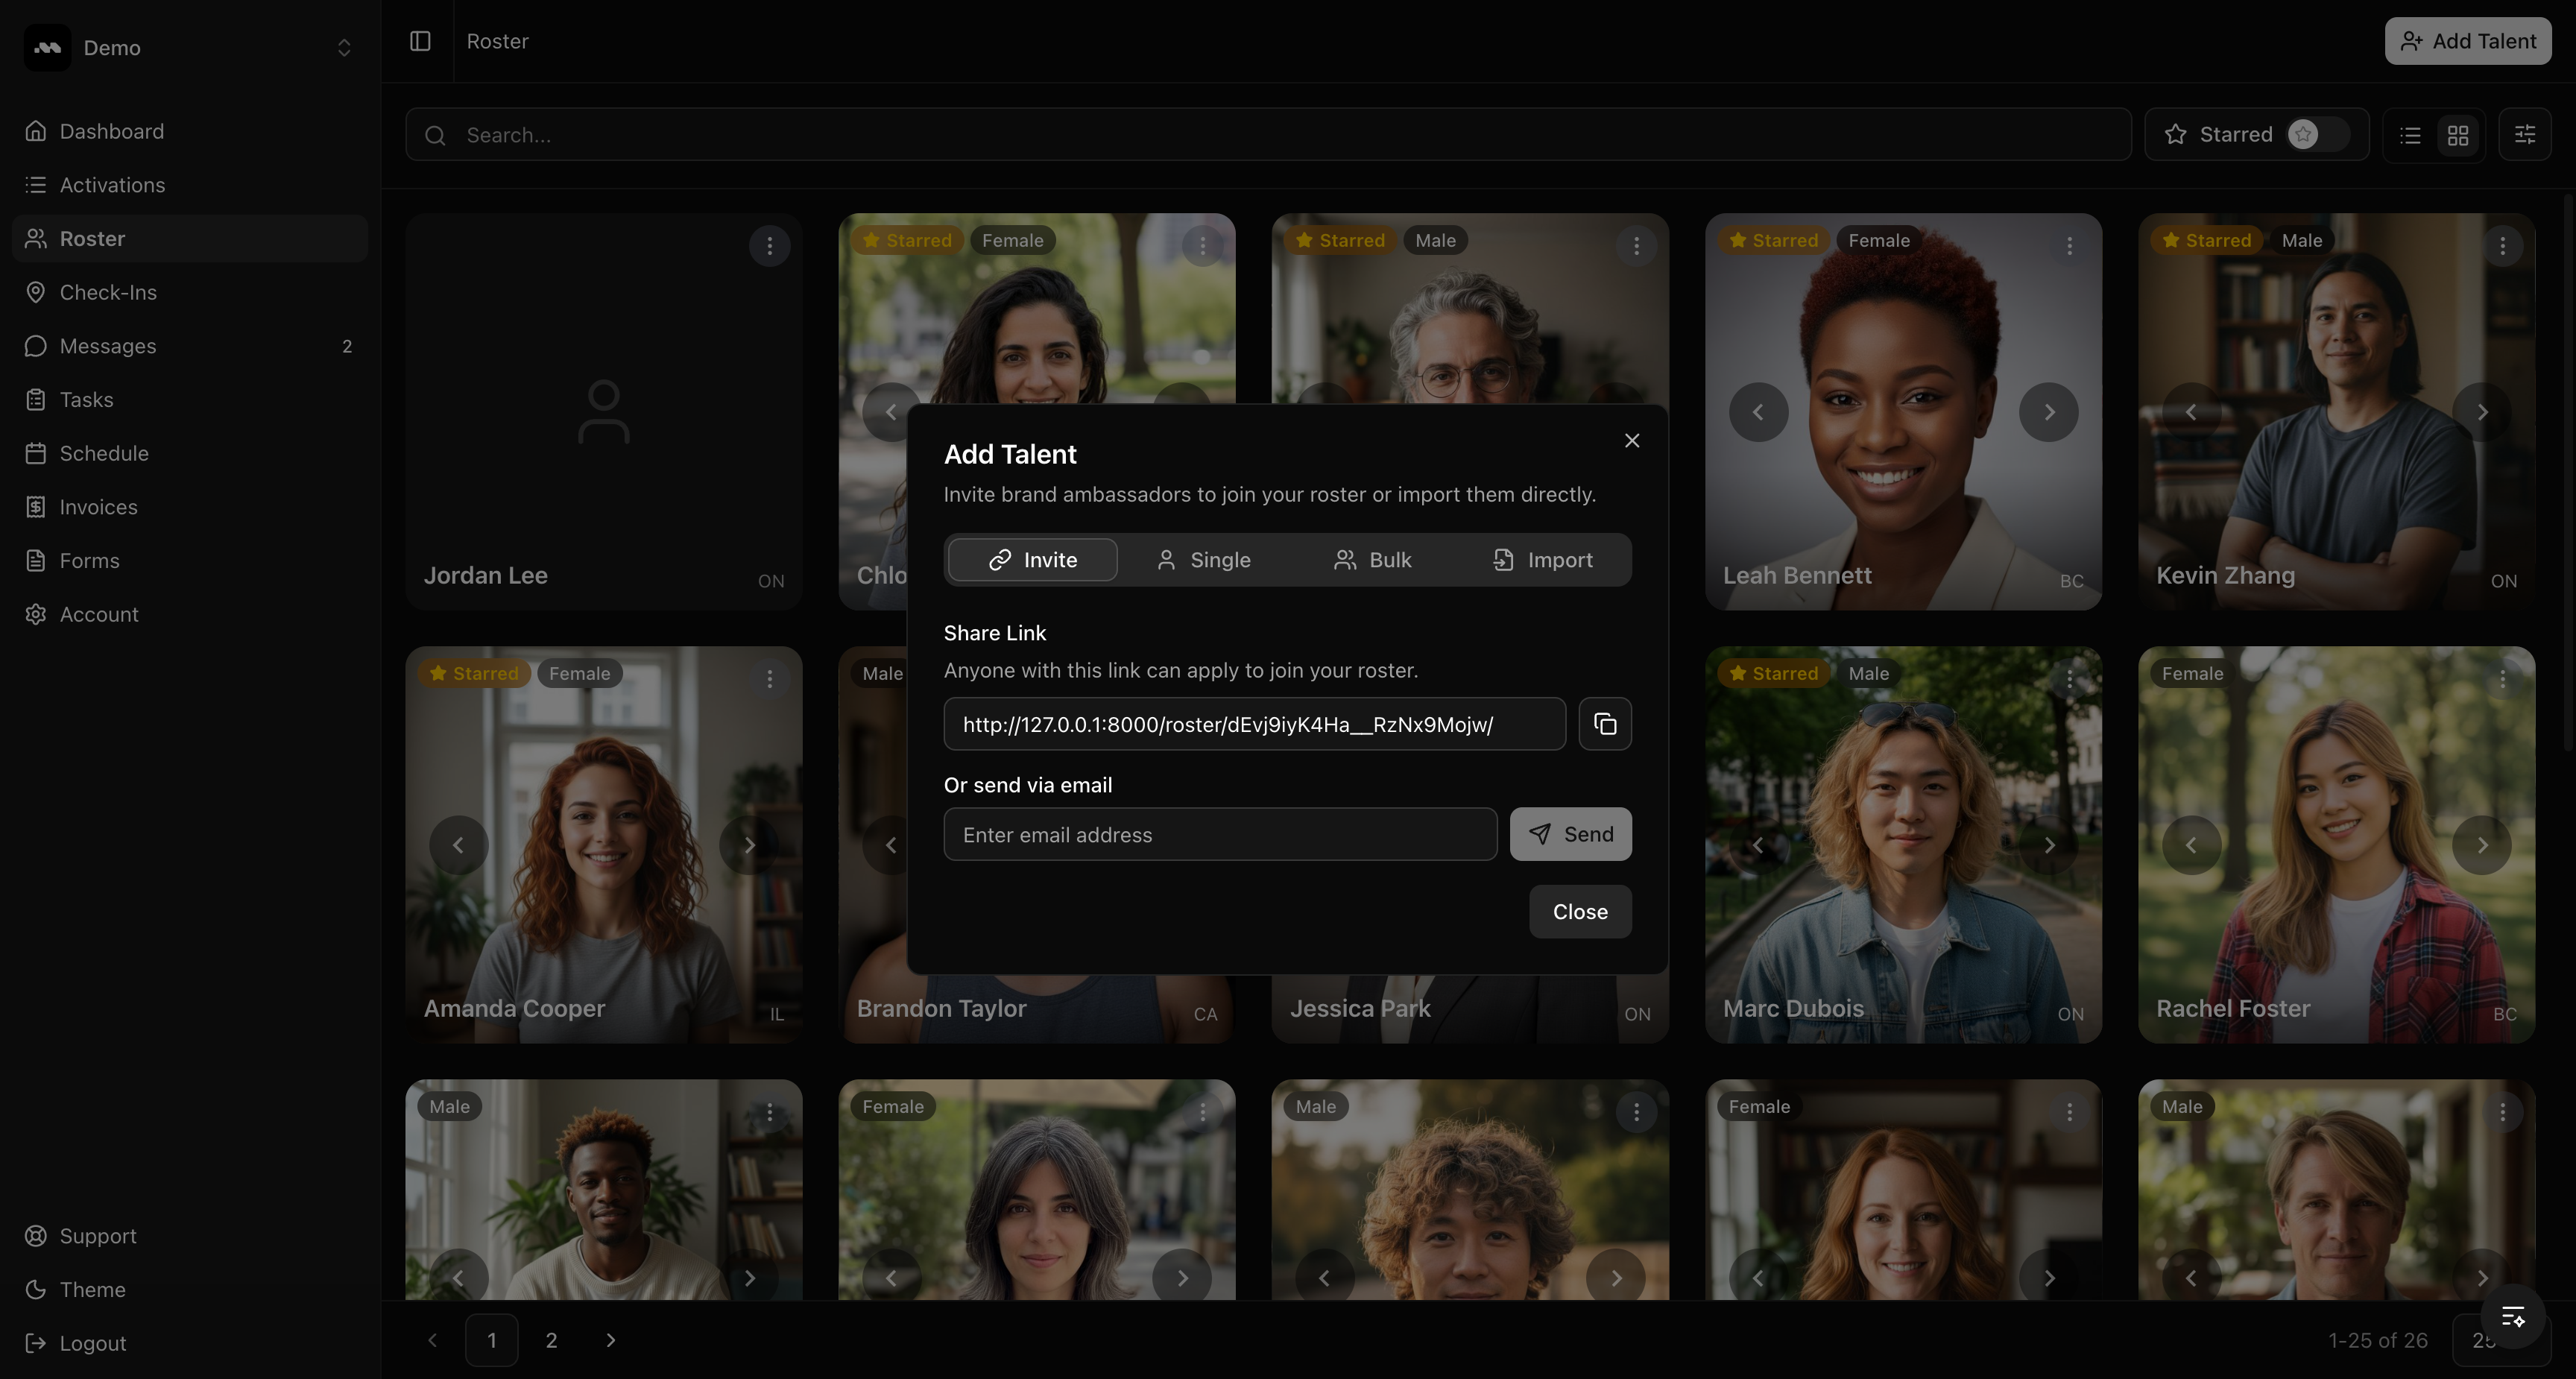
The **Invite** tab is the simplest way to grow your roster. You get two options:
* **Share Link** — Copy your unique roster invite link and share it with ambassadors via text, social media, or any messaging platform. Anyone with this link can apply to join your roster.
* **Send via email** — Enter an email address and click **Send** to email the invite directly from Promo.
The invite link is unique to your agency and stays active permanently. Bookmark it for quick sharing.
## Method 2: Add a single ambassador
Switch to the **Single** tab to manually add one person at a time. Fill in their basic details:
* **First Name** and **Last Name** (required)
* **Email** (required)
## Method 1: Share an invite link
The **Invite** tab is the simplest way to grow your roster. You get two options:
* **Share Link** — Copy your unique roster invite link and share it with ambassadors via text, social media, or any messaging platform. Anyone with this link can apply to join your roster.
* **Send via email** — Enter an email address and click **Send** to email the invite directly from Promo.
The invite link is unique to your agency and stays active permanently. Bookmark it for quick sharing.
## Method 2: Add a single ambassador
Switch to the **Single** tab to manually add one person at a time. Fill in their basic details:
* **First Name** and **Last Name** (required)
* **Email** (required)
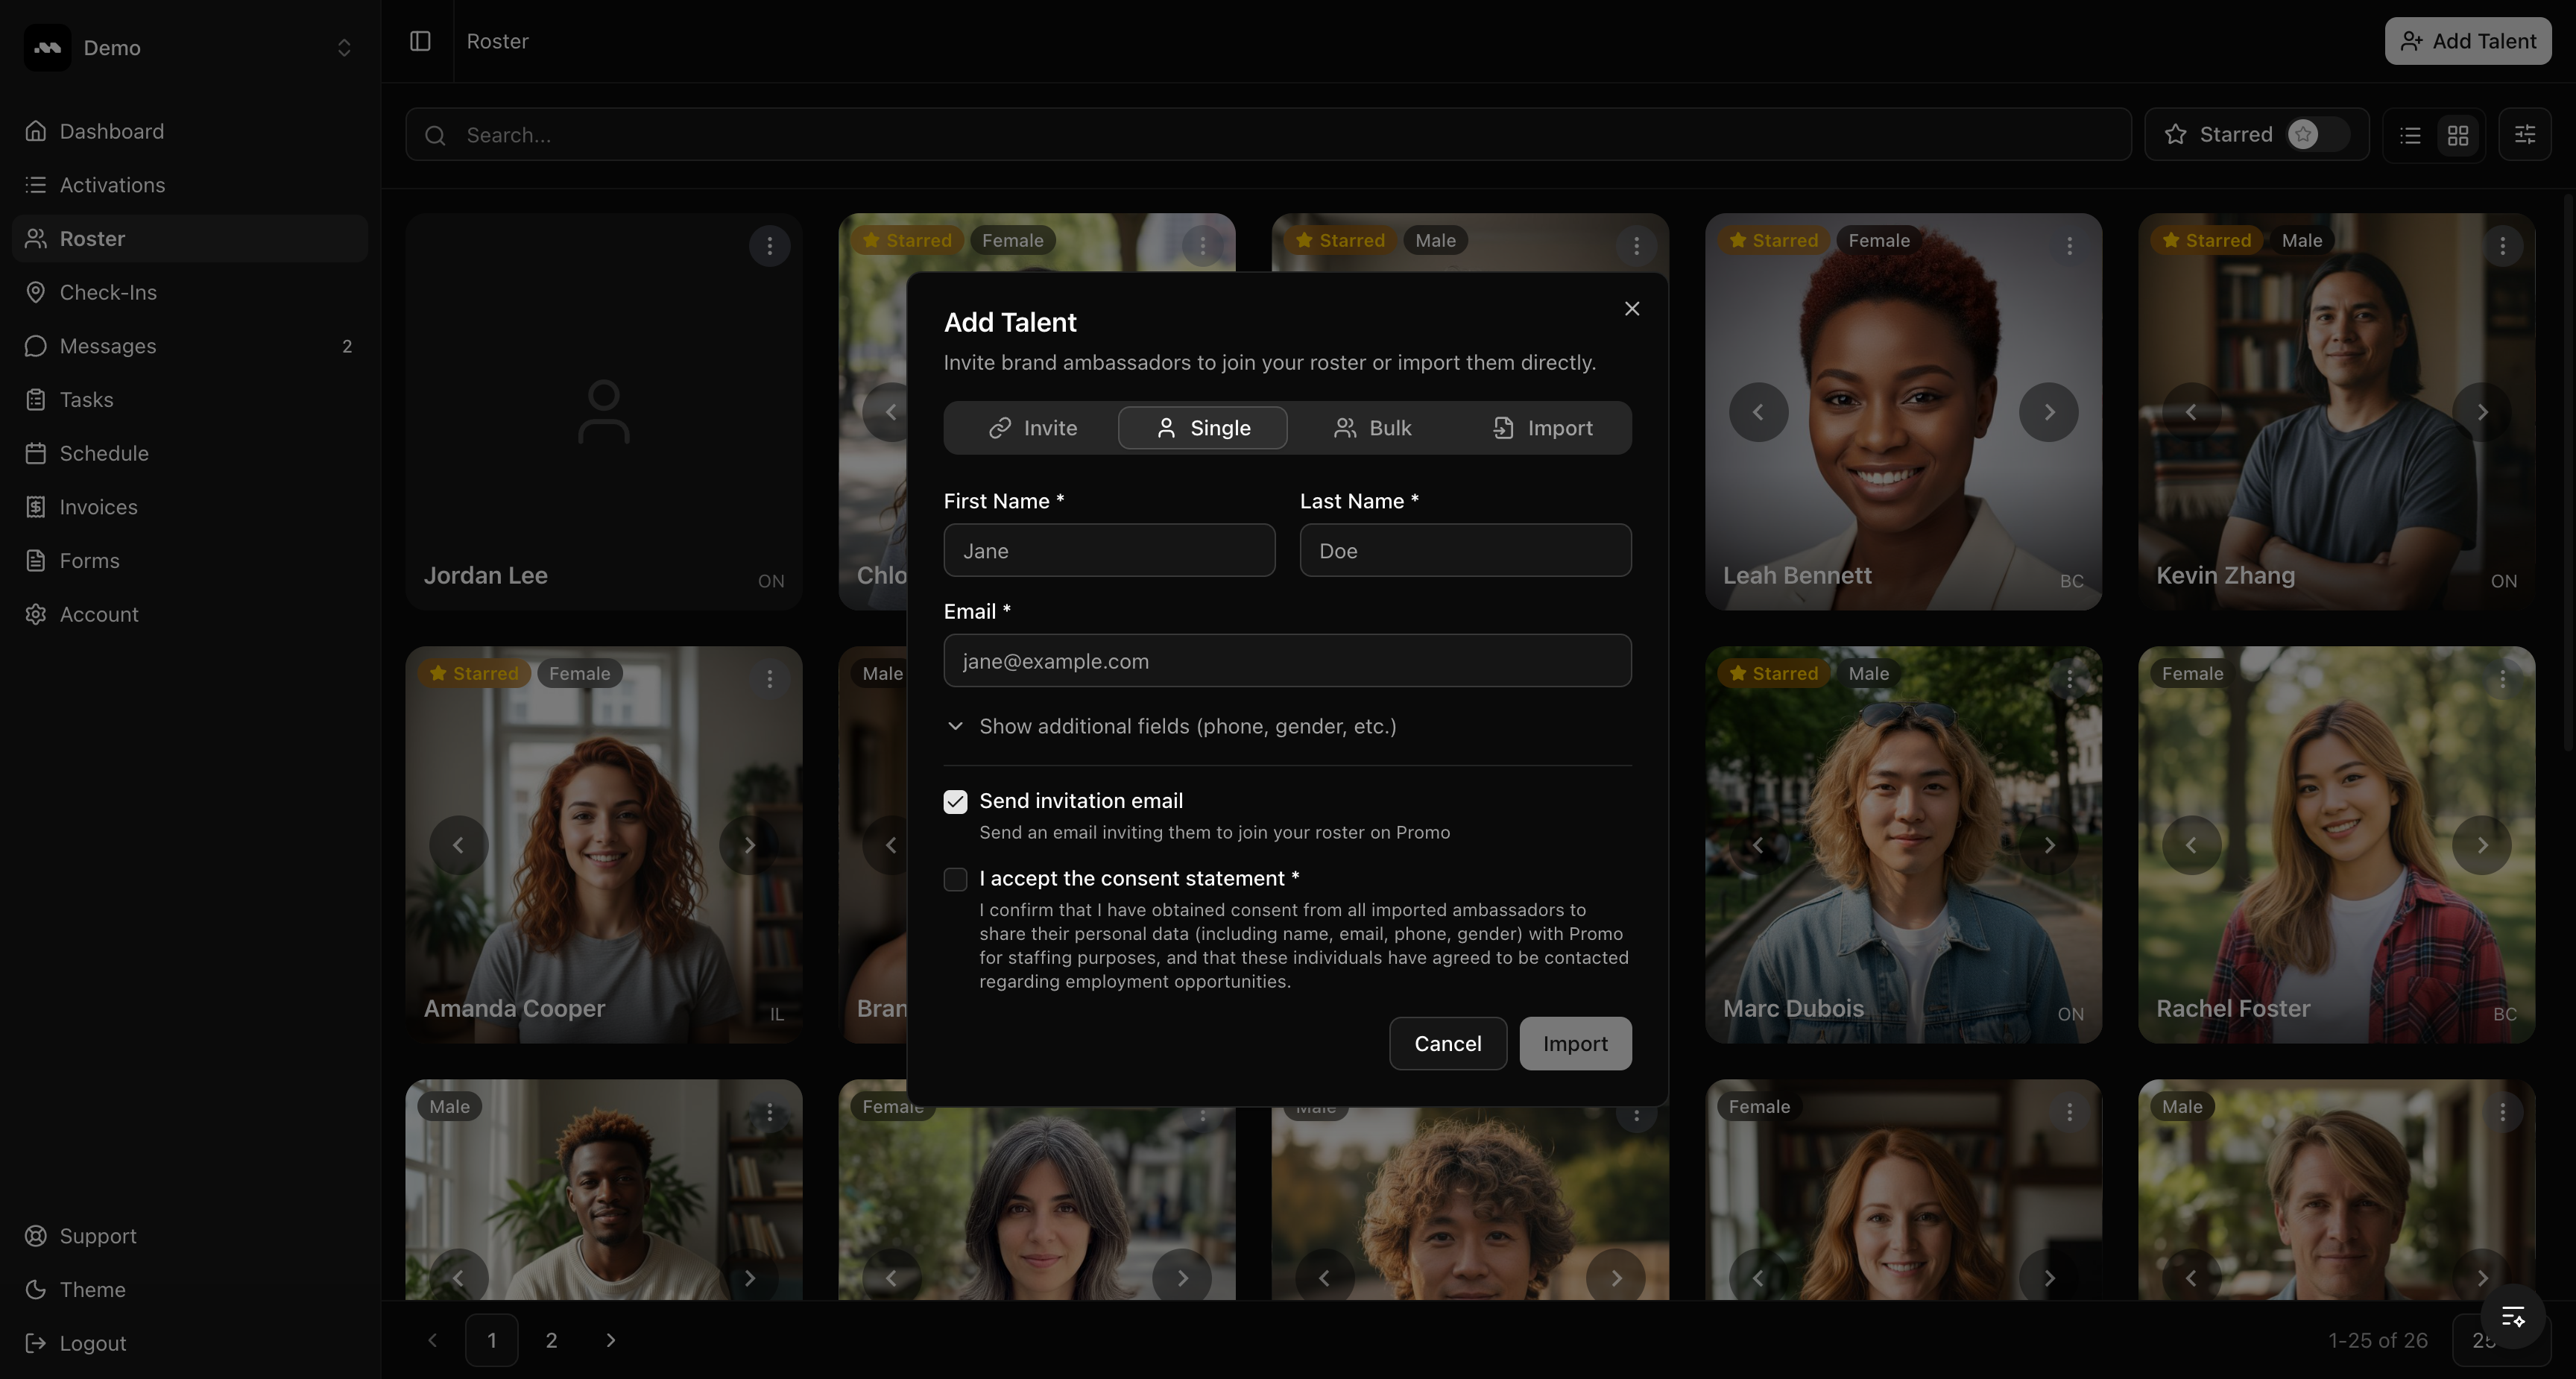 Click **Show additional fields** to add more details like phone number, gender, date of birth, address, internal notes, and up to 3 photos.
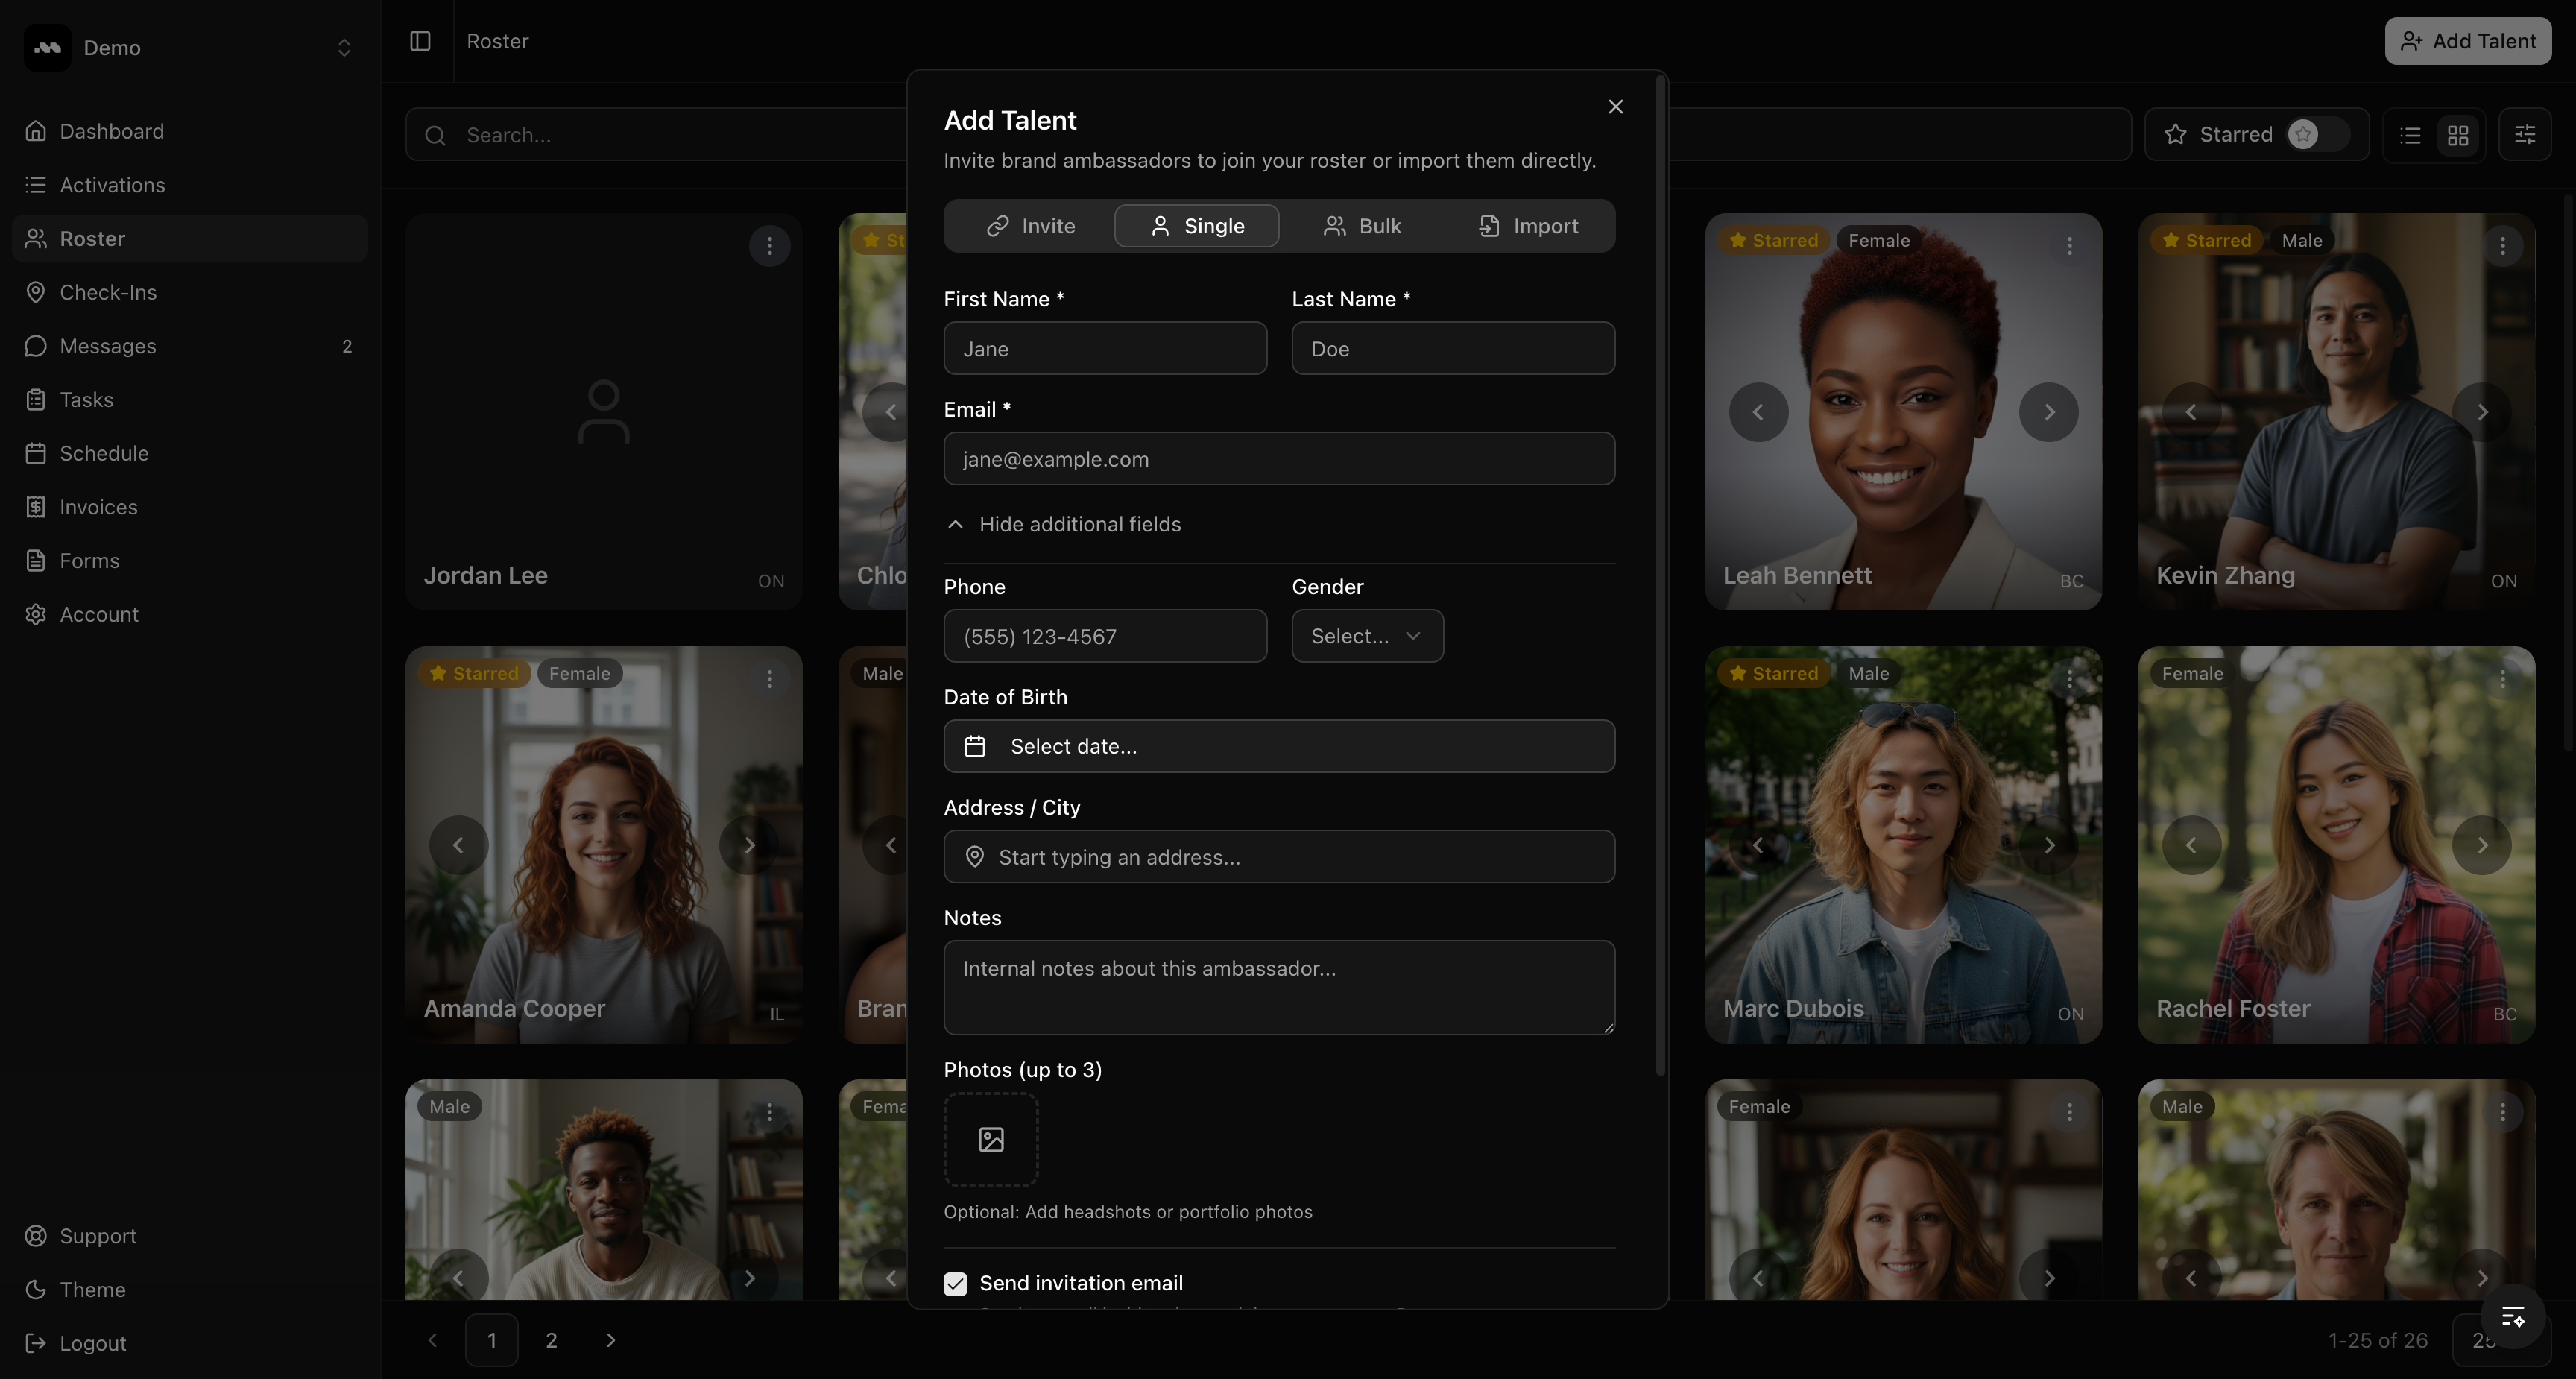 If the email matches an existing Promo account, the ambassador is automatically linked to your roster. Otherwise, they're added to your private roster as a pending entry.
Before importing, you must accept the **consent statement** confirming you have permission to share the ambassador's personal data with Promo.
Check **Send invitation email** to automatically email the ambassador an invite to join Promo and connect with your agency.
## Method 3: Bulk CSV upload
Switch to the **Bulk** tab to import multiple ambassadors at once from a CSV file.
If the email matches an existing Promo account, the ambassador is automatically linked to your roster. Otherwise, they're added to your private roster as a pending entry.
Before importing, you must accept the **consent statement** confirming you have permission to share the ambassador's personal data with Promo.
Check **Send invitation email** to automatically email the ambassador an invite to join Promo and connect with your agency.
## Method 3: Bulk CSV upload
Switch to the **Bulk** tab to import multiple ambassadors at once from a CSV file.
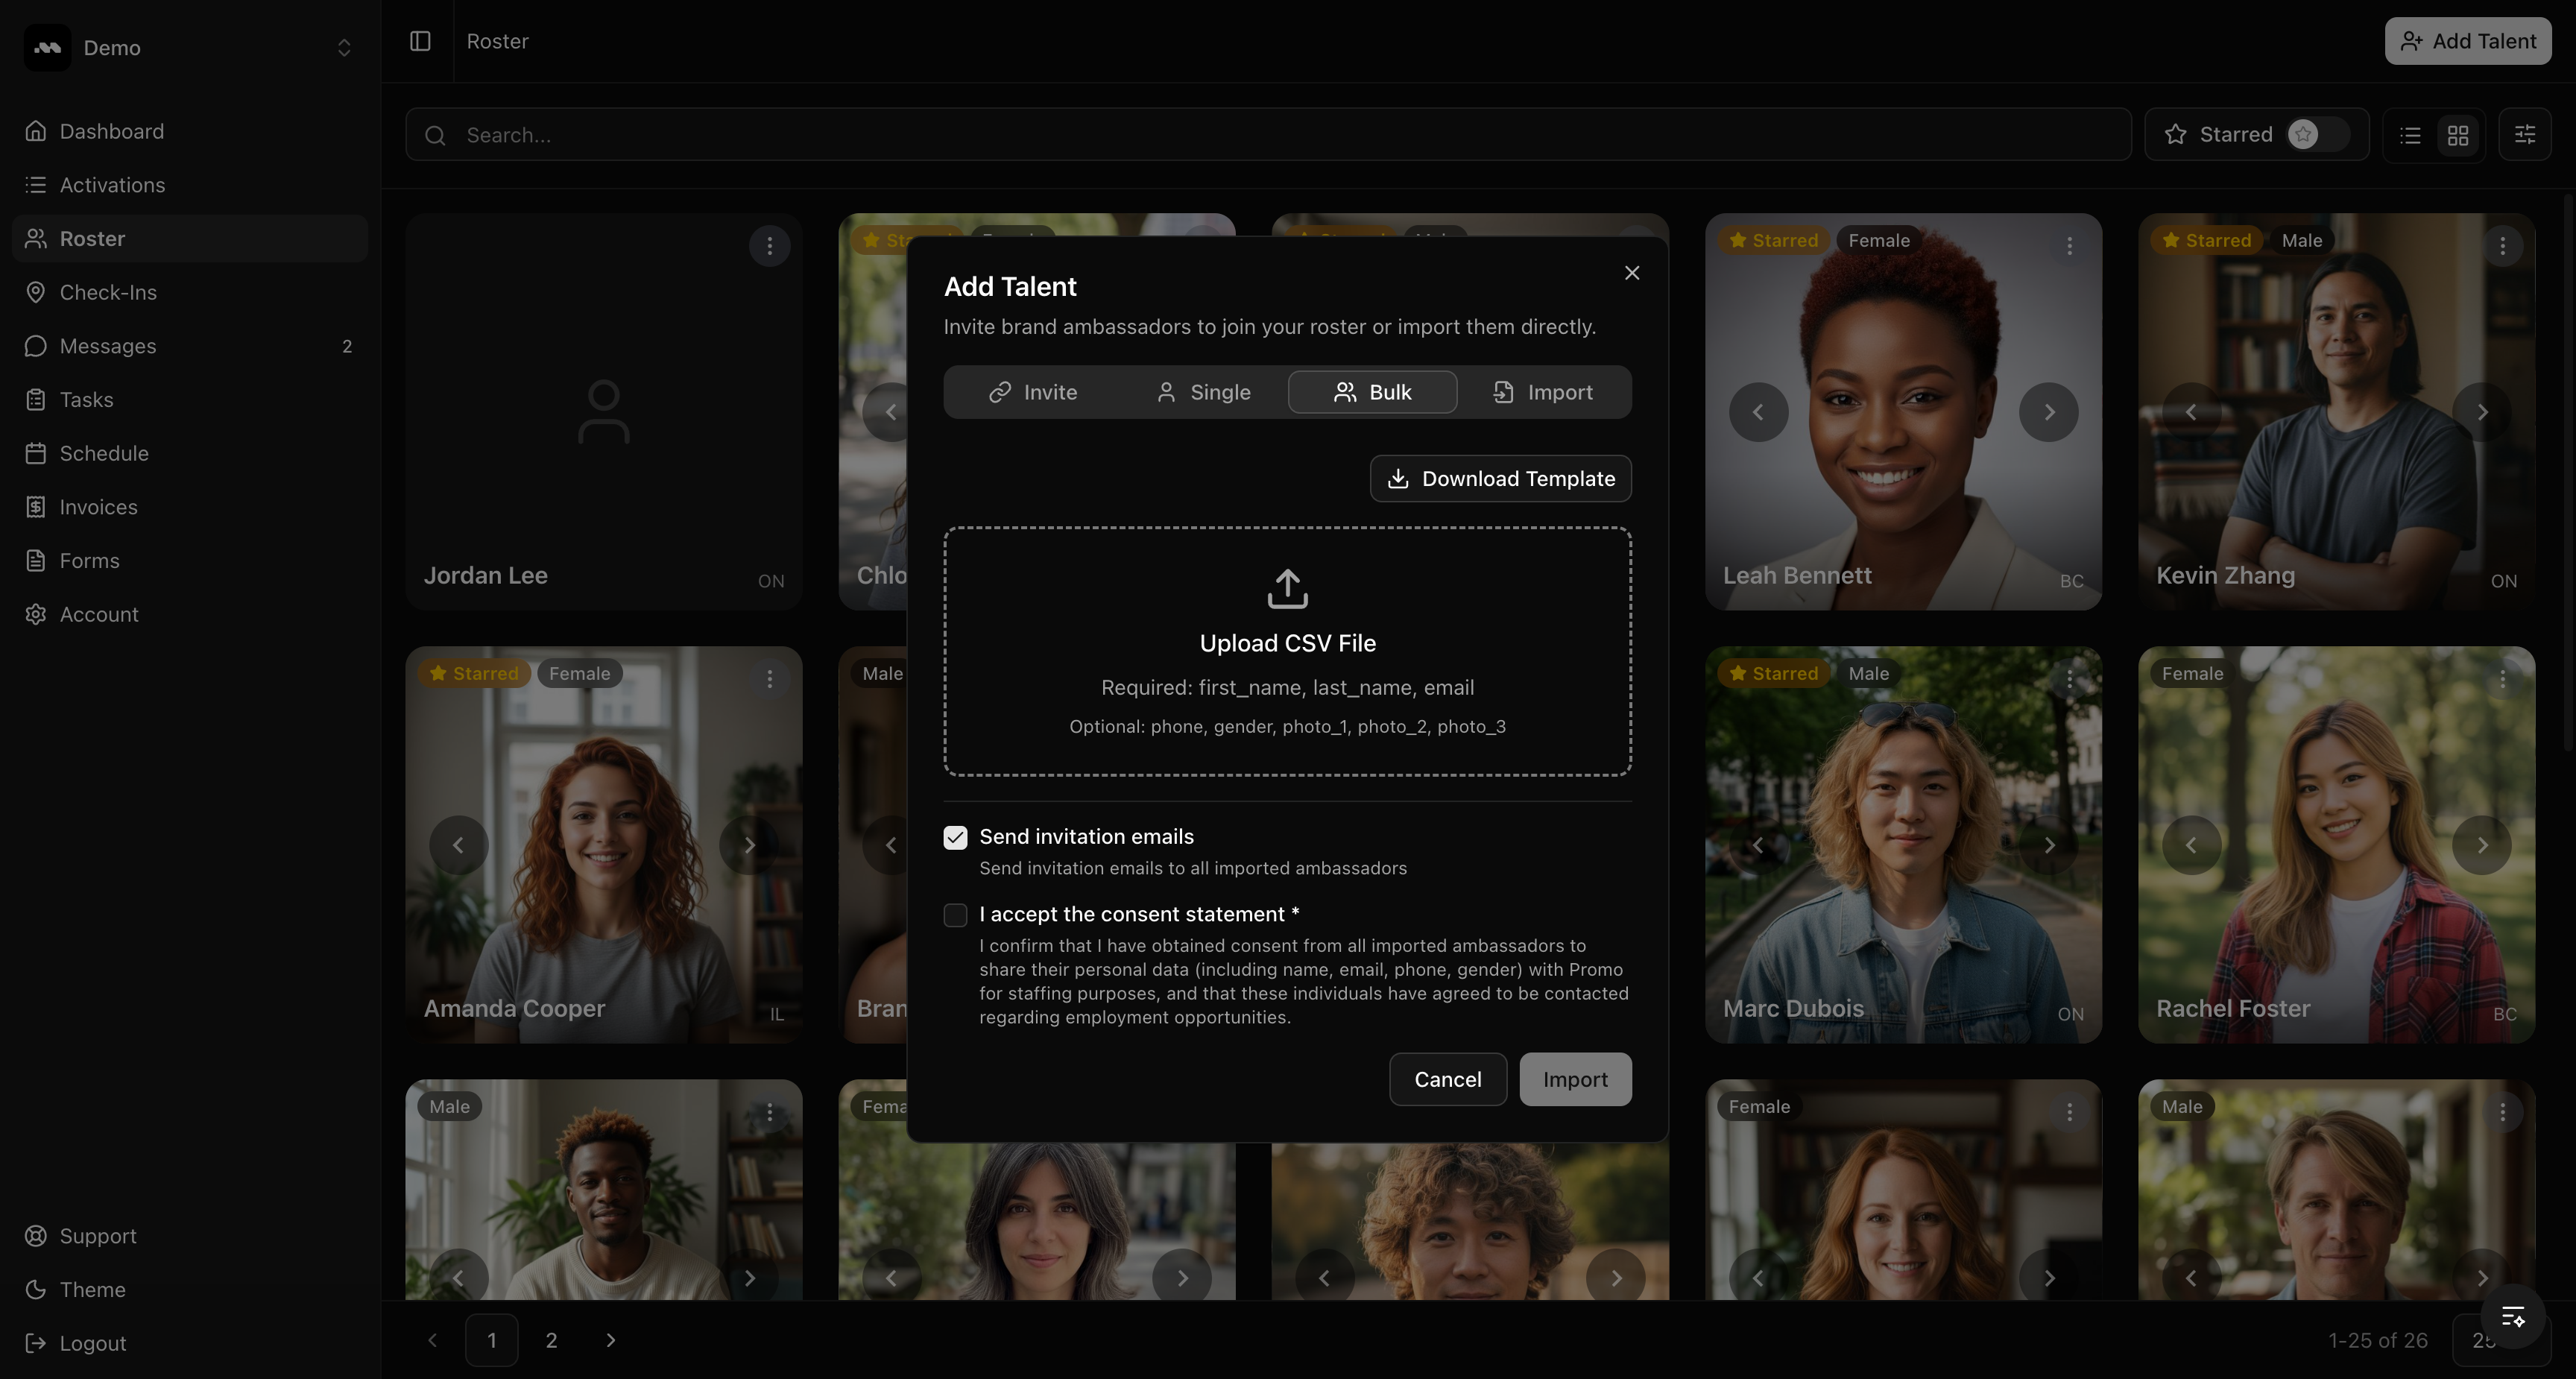 Click **Download Template** to get a CSV file with the correct column headers.
Open the template and add your ambassador data. Required columns are `first_name`, `last_name`, and `email`. Optional columns include `phone`, `gender`, `photo_1`, `photo_2`, and `photo_3`.
Drag your CSV file into the upload area or click to browse. Promo will preview your data and flag any duplicates or errors before importing.
Check the consent statement, then click **Import** to add all valid entries to your roster.
Photo columns accept URLs — if your ambassadors have headshots hosted online, include the direct image URLs in the `photo_1`, `photo_2`, and `photo_3` columns.
## Method 4: Import from another platform
Switch to the **Import** tab to migrate your roster from a staffing platform like PopBookings.
Click **Download Template** to get a CSV file with the correct column headers.
Open the template and add your ambassador data. Required columns are `first_name`, `last_name`, and `email`. Optional columns include `phone`, `gender`, `photo_1`, `photo_2`, and `photo_3`.
Drag your CSV file into the upload area or click to browse. Promo will preview your data and flag any duplicates or errors before importing.
Check the consent statement, then click **Import** to add all valid entries to your roster.
Photo columns accept URLs — if your ambassadors have headshots hosted online, include the direct image URLs in the `photo_1`, `photo_2`, and `photo_3` columns.
## Method 4: Import from another platform
Switch to the **Import** tab to migrate your roster from a staffing platform like PopBookings.
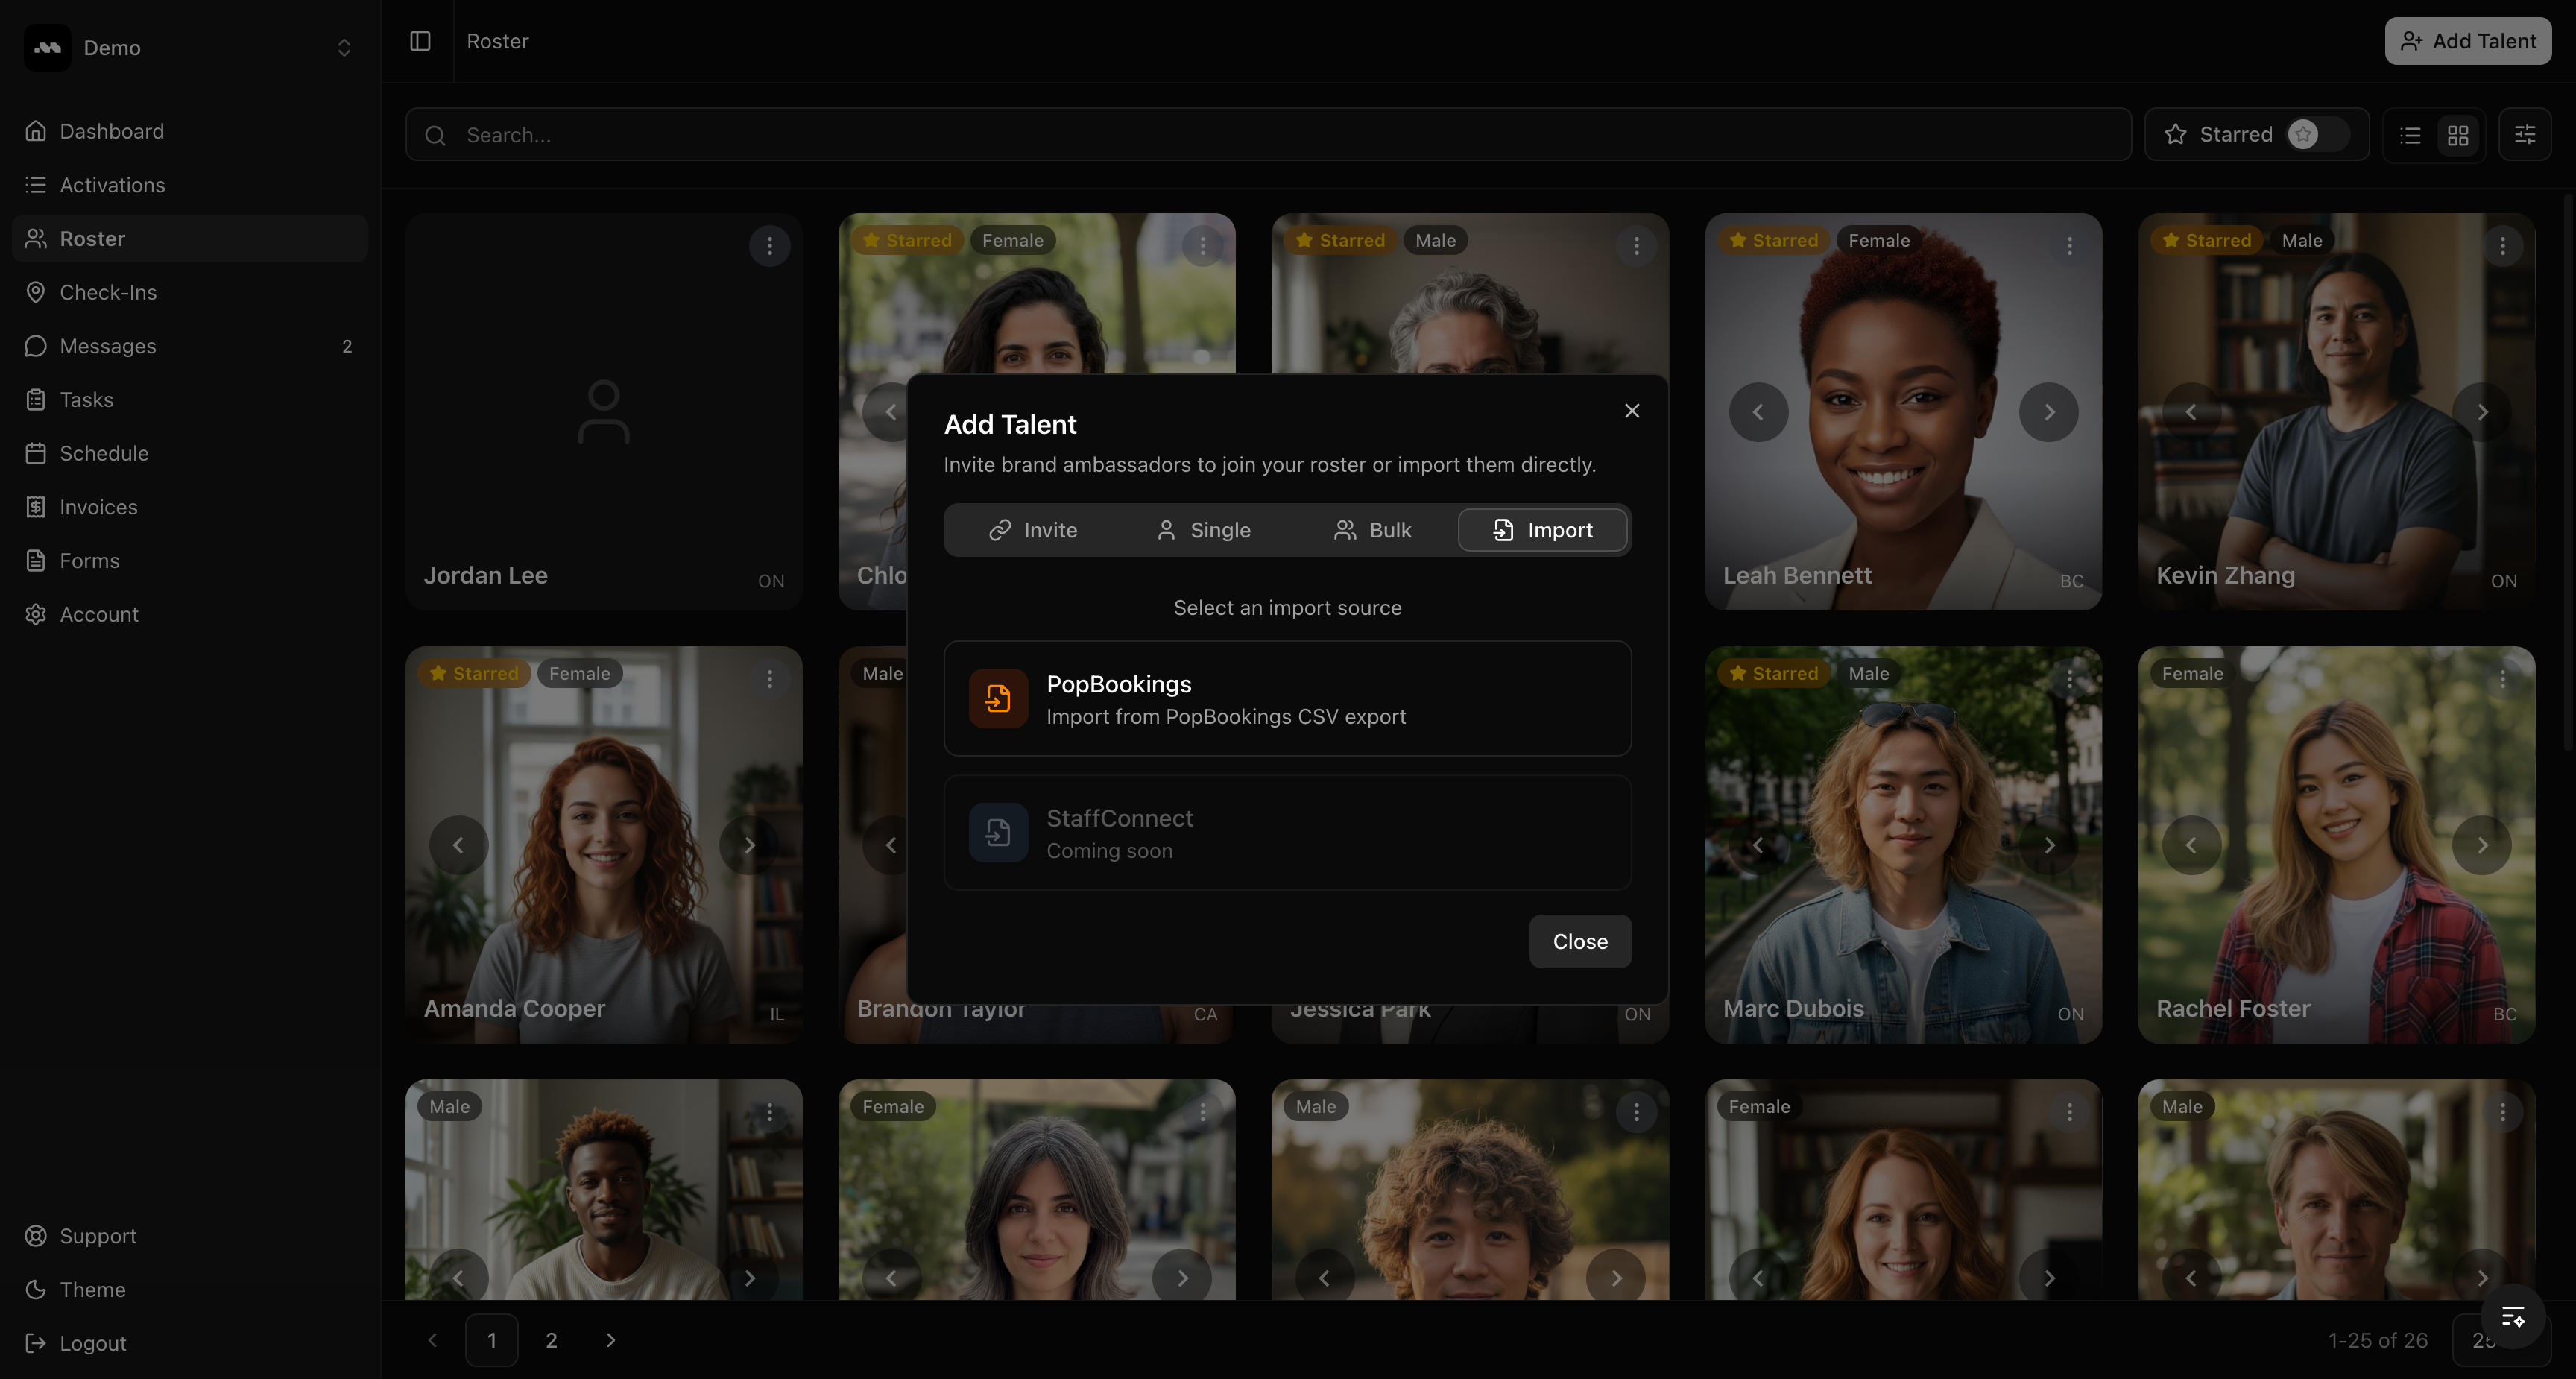 Select **PopBookings** to upload a CSV export from PopBookings. Promo automatically maps PopBookings column names to the correct fields and downloads any linked photos.
StaffConnect import is coming soon. Contact support if you need to migrate from another platform not listed here.
## View ambassador details
Click on any ambassador card to open the detail panel on the right side of the screen. This shows their full profile including:
* Media portfolio photos
* Work experience and education
* Skills and certifications
* Applications to your activations
* Reviews and ratings from your team
Select **PopBookings** to upload a CSV export from PopBookings. Promo automatically maps PopBookings column names to the correct fields and downloads any linked photos.
StaffConnect import is coming soon. Contact support if you need to migrate from another platform not listed here.
## View ambassador details
Click on any ambassador card to open the detail panel on the right side of the screen. This shows their full profile including:
* Media portfolio photos
* Work experience and education
* Skills and certifications
* Applications to your activations
* Reviews and ratings from your team
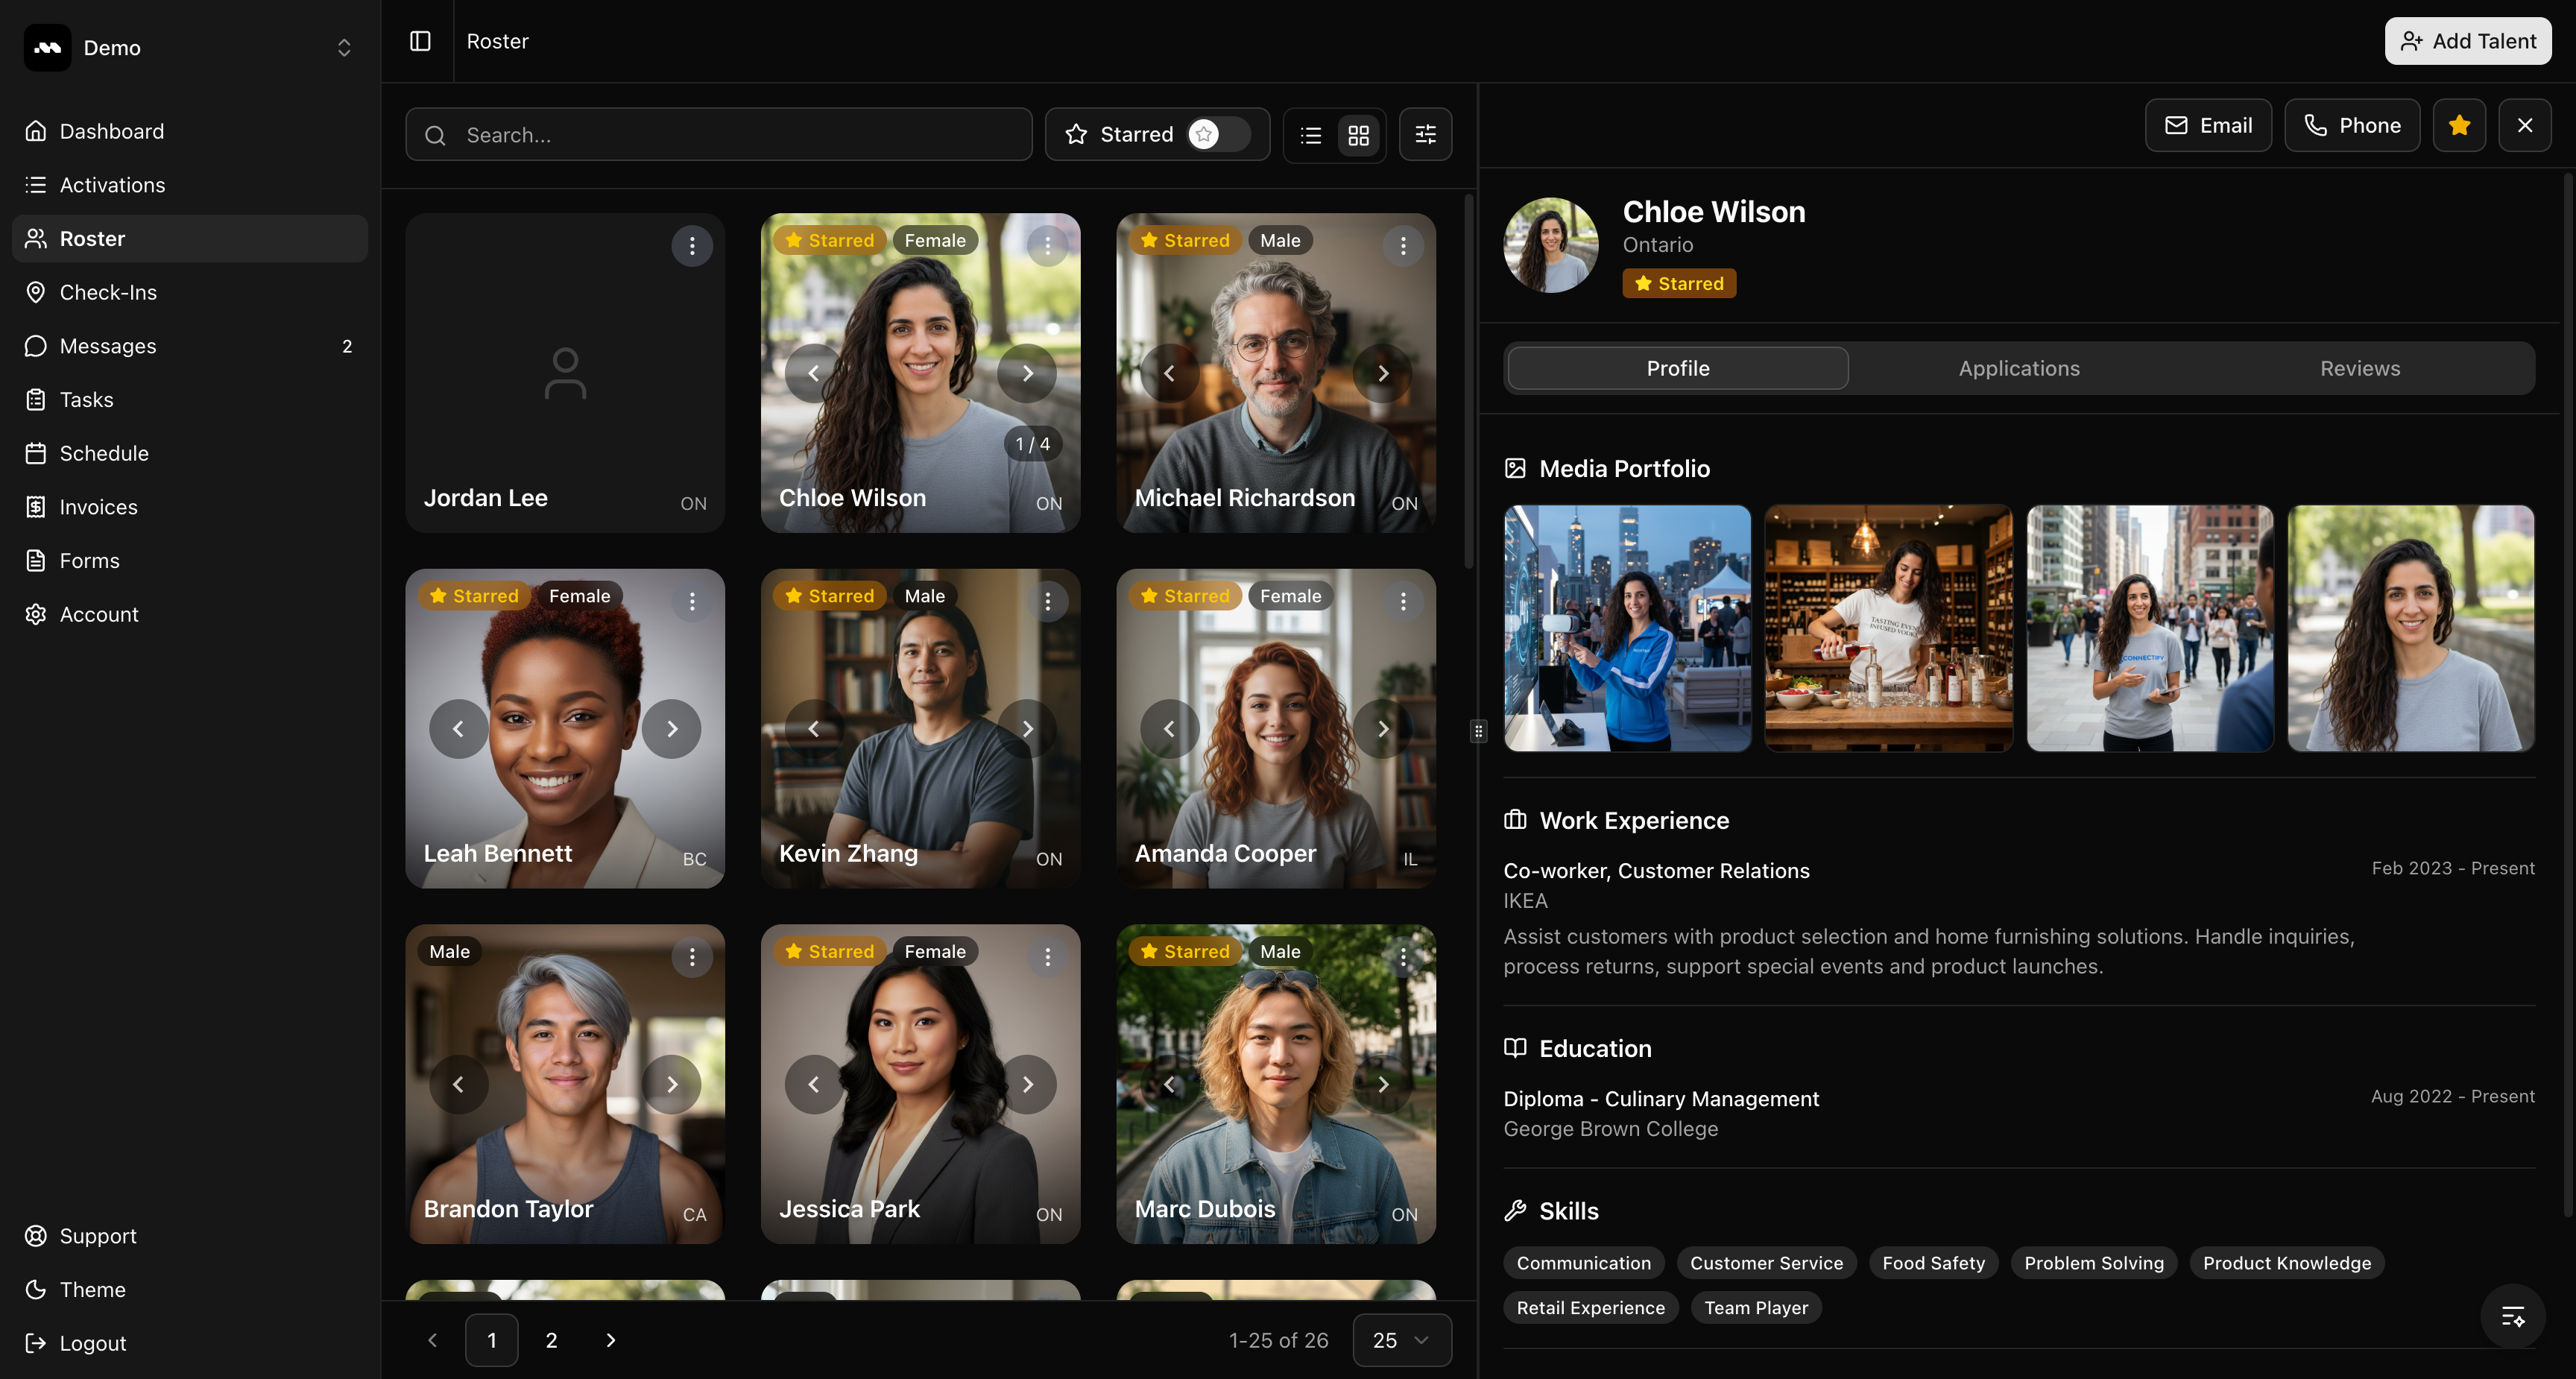 From the detail panel, you can:
* **Star** an ambassador to mark them as a favorite
* **Email** or **Phone** them directly
* Switch to the **Applications** tab to see their history with your agency
* Switch to the **Reviews** tab to add ratings and notes
## Tips
Use the **Starred** toggle in the toolbar to quickly filter your roster down to your top talent.
Ambassadors who apply to your activations are automatically added to your roster — no manual import needed.
When importing ambassadors, make sure you have their consent to share their personal data with Promo. This is required by the consent statement and helps protect everyone's privacy.
From the detail panel, you can:
* **Star** an ambassador to mark them as a favorite
* **Email** or **Phone** them directly
* Switch to the **Applications** tab to see their history with your agency
* Switch to the **Reviews** tab to add ratings and notes
## Tips
Use the **Starred** toggle in the toolbar to quickly filter your roster down to your top talent.
Ambassadors who apply to your activations are automatically added to your roster — no manual import needed.
When importing ambassadors, make sure you have their consent to share their personal data with Promo. This is required by the consent statement and helps protect everyone's privacy.